

Staining in Clinical Microscopy: Revealing the Invisible
Table of Contents
Staining in Clinical Microscopy
In the world of Medical Technology, Clinical Microscopy is a cornerstone. It’s a field that allows us to peer into the microscopic world, revealing details that would otherwise remain invisible to the naked eye. One of the most crucial techniques in this field is staining. Staining is like the magic wand that brings the invisible to light, adding color and contrast to our microscopic observations. It’s a technique that has been used for centuries, and yet, it never ceases to amaze me. Each stain, each slide, each microscopic view opens up a new world of understanding, a new perspective on the intricate workings of life.
Staining is not just a technique; it’s a journey into the unseen. It’s a way to explore the intricate structures of cells, to unravel the mysteries of disease, and to gain insights into the mechanisms of life. It’s a tool that transforms the invisible into a spectacle of colors, patterns, and structures. Each stained slide is a window into a world that is as fascinating as it is complex.
So, let’s embark on this journey together. Let’s delve into the world of staining, explore its science, its art, and its importance in Clinical Microscopy. Let’s uncover the secrets that lie beneath the surface, hidden in the microscopic details of cells and tissues. Let’s reveal the invisible.
The Science Behind Staining in Clinical Microscopy
Staining, in essence, is a technique that uses dyes to color different parts of a cell or tissue. But why do we need to color these microscopic structures? Well, under a microscope, most biological samples are transparent or translucent. Staining adds contrast, making it easier to distinguish different structures and observe their details. But it’s not just about making things visible; it’s about understanding them. Each stain, each color, each pattern tells a story about the cell or tissue we’re observing. It reveals information about its structure, its function, its health, and its disease state.
The science behind staining is fascinating. It’s a dance of molecules, where the dye molecules bind to specific structures in the cell or tissue. The type of dye, its concentration, and the duration of staining all play a role in the final result. It’s a delicate balance, a fine-tuning of parameters to achieve the perfect stain. And when it works, it’s like magic. The invisible becomes visible, the details come into focus, and the microscopic world comes to life.
But staining is not just a science; it’s also an art. It requires skill, patience, and a keen eye for detail. It’s about knowing how to prepare the sample, how to apply the stain, how to wash it, and how to observe it under the microscope. It’s about understanding the nuances of each stain, the subtleties of each color, and the significance of each pattern. It’s a craft that takes time to master, but the rewards are well worth the effort.
Types of Stains and Their Uses
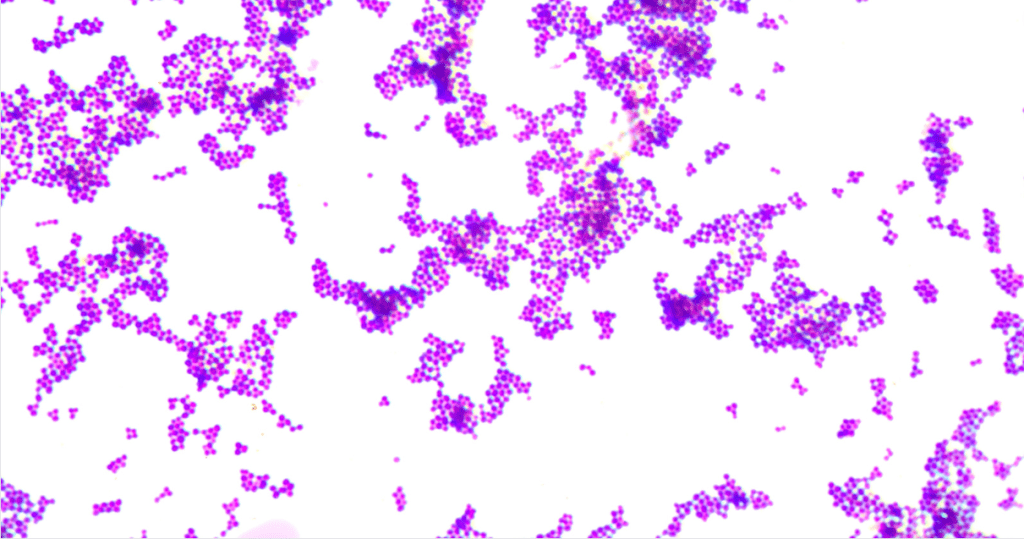
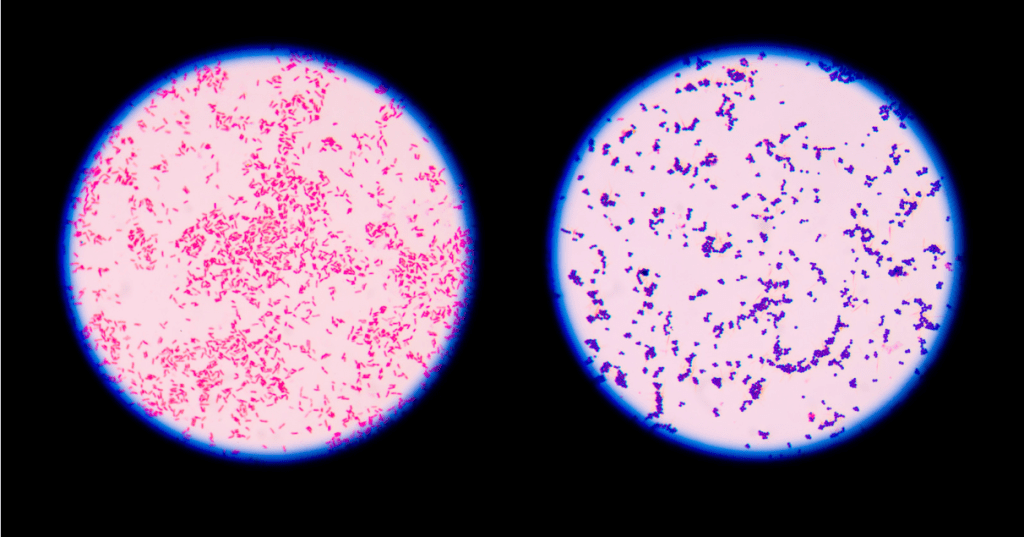
There’s a whole palette of stains that we use in Clinical Microscopy, each with its own unique properties and uses. For instance, the Gram stain, named after the Danish bacteriologist Hans Christian Gram, is used to differentiate bacteria into two large groups: Gram-positive and Gram-negative. Gram staining is nothing short of fascinating. It’s like revealing the secret identities of bacteria, each with its unique color code.
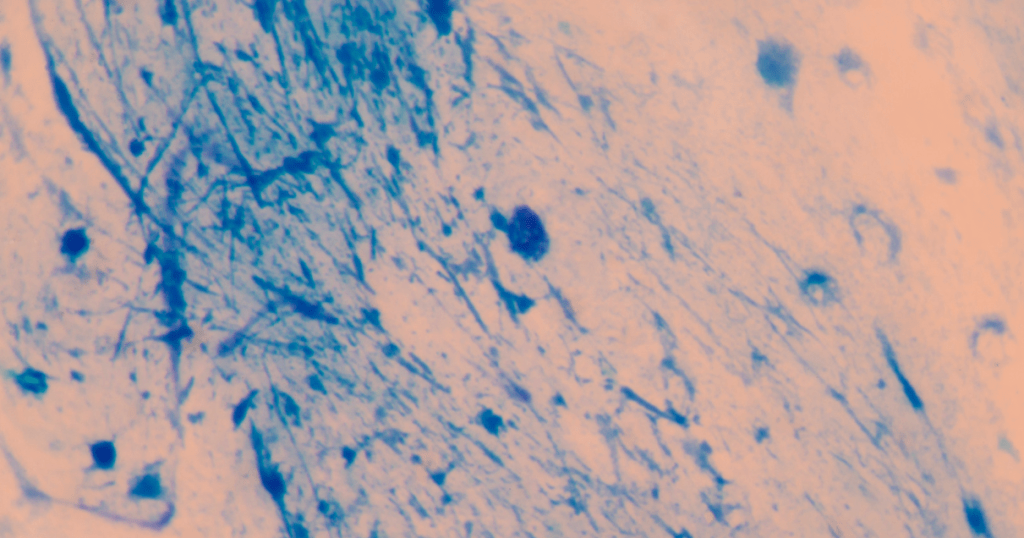
But Gram staining is just the tip of the iceberg. There are many other types of stains, each designed to highlight specific structures or components of cells and tissues. There’s the Hematoxylin and Eosin stain, commonly used in histology to reveal the general structure of cells and tissues. There’s the Ziehl-Neelsen stain, used to identify acid-fast bacteria like Mycobacterium tuberculosis. There’s the Giemsa stain, used to detect parasites like Plasmodium, the causative agent of malaria. And the list goes on. Each stain is a tool, a key to unlock a specific door in the microscopic world.
The beauty of these stains lies not just in the colors they produce, but in the insights they provide. Each stain reveals a different aspect of the cell or tissue, a different piece of the puzzle. And when you put these pieces together, you get a comprehensive picture of the microscopic world. You get to see the structures, the patterns, the anomalies, the signs of disease. You get to understand the story that each cell, each tissue is telling.
And that’s the power of staining. It’s not just about coloring cells and tissues; it’s about understanding them. It’s about gaining insights into the microscopic world, and using these insights to diagnose diseases, to guide treatments, and to advance our knowledge of life.
Common Types of Stains and Their Uses
| Stain | Use |
|---|---|
| Gram Stain | Differentiates bacteria into Gram-positive and Gram-negative. |
| Acid-fast Stain | Used to identify bacteria that are not decolorized by acid-alcohol. |
| Endospore Stain | Used to stain endospores within bacteria. |
| Negative Stain | Used to stain the background of the slide, leaving the cells unstained. |
The Process of Staining in Clinical Microscopy
Staining is more than just adding color; it’s a meticulous process that requires precision and patience. From preparing the slide, applying the stain, to washing and drying, each step is crucial to the final result. Over time, I’ve picked up a few tricks that have helped me perfect my staining technique. For instance, I’ve learned that the washing step is just as important as the staining itself. Too much washing can wash away the stain, while too little can leave the slide overly stained and hard to read.
The process of staining is like a ritual. It starts with the preparation of the slide, which involves fixing the sample to prevent degradation and preserve its structure. Then comes the application of the stain, a step that requires precision and control. The stain needs to be applied evenly, and for the right amount of time, to ensure optimal staining. After the stain is applied, the slide is washed to remove excess stain and prevent over-staining. Finally, the slide is dried and ready for observation under the microscope.
But the process doesn’t end there. Observing the slide under the microscope is an integral part of the staining process. It’s about understanding what the stain reveals, interpreting the colors and patterns, and making sense of the microscopic world. It’s about using the power of staining to gain insights into cells and tissues, to diagnose diseases, and to advance our understanding of life.
Steps in the Staining Process
- Sample Preparation: This involves collecting the sample and preparing it for staining. This could involve processes like fixation to preserve the structure of the cells or tissues.
- Application of the Primary Stain: The primary stain is applied to the sample. The choice of stain depends on what you want to observe.
- Washing: The excess stain is washed off, leaving the stain only where it has bound to specific structures.
- Application of the Counterstain: A counterstain of a different color is applied. This helps to distinguish different structures or cells within the sample.
- Washing and Drying: The excess counterstain is washed off, and the sample is dried.
- Observation: The stained sample is observed under the microscope.
The Art of Staining in Clinical Microscopy
While staining is undoubtedly a scientific technique, I can’t help but see it as an art form. The way different stains bring out the colors and patterns in cells and tissues is truly beautiful. It’s like each slide is a unique piece of art, with its own story to tell. I’ve spent countless hours in the lab, mesmerized by the beauty of stained slides under the microscope.
Staining is an art that requires skill, patience, and a keen eye for detail. It’s about understanding the nuances of each stain, the subtleties of each color, and the significance of each pattern. It’s about mastering the technique, perfecting the process, and creating beautiful, informative slides. But more than that, it’s about appreciating the beauty of the microscopic world, the intricate structures of cells and tissues, and the complex interplay of life.
But the art of staining is not just about creating beautiful slides; it’s also about interpreting them. It’s about understanding what the colors and patterns reveal, deciphering the story that each slide tells. It’s about using the power of staining to gain insights into the microscopic world, to diagnose diseases, and to advance our understanding of life. It’s an art that combines science and creativity, precision and interpretation, technique and insight. And that’s what makes it so fascinating, so rewarding, and so crucial in the field of Clinical Microscopy.
Tips for Successful Staining
- Always handle your samples with clean tools to avoid contamination.
- Follow the staining protocol carefully. Each step is important for the final result.
- Be patient. Some staining processes can take time, but rushing can lead to poor results.
- Practice makes perfect. Don’t be discouraged if your first few attempts don’t turn out as expected. Keep practicing and refining your technique.
Staining in the Real World: Clinical Applications
Staining isn’t just about creating beautiful images; it has real-world clinical applications. In disease diagnosis, for instance, staining can help identify the presence of certain bacteria or abnormalities in tissue samples. In my journey as a Medical Technology student, I’ve come to appreciate the crucial role staining plays in healthcare. It’s a tool that allows us to see the unseen, to detect the undetectable, and to diagnose diseases with precision and accuracy.
In the clinical setting, staining is used in a variety of ways. It’s used in microbiology to identify bacteria and parasites, in histology to study the structure of tissues, and in cytology to examine cell samples. Each stain, each color, each pattern provides valuable information that can guide diagnosis and treatment. It’s a tool that transforms the invisible into a spectacle of colors and patterns, revealing the secrets of disease and health.
But staining is not just a tool; it’s a skill. It requires precision, patience, and a keen eye for detail. It’s about knowing how to prepare the sample, how to apply the stain, how to wash it, and how to observe it under the microscope. It’s about understanding the nuances of each stain, the subtleties of each color, and the significance of each pattern. It’s a craft that takes time to master, but the rewards are well worth the effort.
The Future of Staining in Clinical Microscopy
As we look to the future, I believe staining and Clinical Microscopy will continue to evolve. New staining techniques and technologies are being developed, promising even more detailed and colorful microscopic images. As a budding Medical Technologist, I’m excited to see where these developments will take us. The future of staining is bright, filled with possibilities and potential.
Innovation in staining techniques and technologies is opening up new frontiers in Clinical Microscopy. From digital pathology to automated staining systems, the field is undergoing a transformation. These advancements are not only improving the quality of staining but also making the process more efficient and accurate. They’re enabling us to see the microscopic world in ways we never thought possible.
But the future of staining is not just about technology; it’s also about knowledge. As we continue to learn more about cells and tissues, about diseases and health, we’re developing new stains, new techniques, and new approaches. We’re pushing the boundaries of what’s possible in Clinical Microscopy, and I can’t wait to be part of this exciting journey.
Conclusion
In conclusion, staining is an integral part of Clinical Microscopy. It’s a technique that combines science and art, revealing the invisible and adding color to our microscopic observations. As I continue my journey in Medical Technology, I look forward to exploring more of this fascinating field and sharing my experiences with you.
This post is part of my Clinical Microscopy category. Please check out index page on Clinical Microscopy
Other posts of interest: Immunohistochemistry and immunofluorescence staining and Acid-fast staining (Ziehl-Neelsen, Kinyoun) and interpretation
Disclaimer: This blog post is based on my personal experiences and learnings in the field of Medical Technology. It’s intended for informational purposes only and should not be used as a replacement for professional medical advice.
Frequently Asked Questions
What is staining in microscopy?
Staining in microscopy is a technique used to enhance contrast in the microscopic image. Stains and dyes are frequently used in biology and medicine to highlight structures in biological tissues for viewing, often with the aid of different microscopes.
What are the 4 types of stain?
The four main types of stains used in microscopy are simple stains, differential stains, special stains, and negative stains. Each type has a specific purpose and is used to reveal different structures and details within the sample.
What is the most common staining method for microscopy?
The most common staining method for microscopy is the Gram stain, which is a type of differential stain. It’s used to differentiate bacterial species into two large groups: Gram-positive and Gram-negative.
Why is staining important in microscopy?
Staining is important in microscopy because it increases the contrast of the specimen, making it easier to distinguish the details of the sample. It can also highlight specific parts of the specimen for more detailed study.
What is the purpose of staining techniques?
The purpose of staining techniques is to add contrast to the microscopic image and to reveal specific structures within the sample that would otherwise be difficult or impossible to see. Staining can also help to differentiate between different types of cells or microorganisms.
What is the importance of staining process?
The staining process is important because it allows scientists to see structures, like cells or tissues, in greater detail under a microscope. This can help in identifying bacteria or other microorganisms, diagnosing diseases, or understanding the structure of various biological samples.
What is staining and why is it important in microbiology?
In microbiology, staining is used to make microorganisms visible under the microscope. Stains can highlight different parts of the microorganism, helping to identify its structure, type, and any abnormalities. This is crucial in diagnosing infections and understanding microbial biology.
What are the different types of microscope staining?
There are several types of microscope staining techniques, including simple staining, differential staining, negative staining, and special staining. Each technique serves a different purpose and can reveal different information about the sample.
What is the best method for staining?
The “best” method for staining really depends on what you’re trying to observe. For general purposes, simple staining is often sufficient. However, for more detailed observations, such as distinguishing between different types of bacteria, differential staining methods like the Gram stain or Acid-fast stain might be more appropriate.
What is the most common type of staining?
The most common type of staining is probably the Gram stain, a differential staining technique used to classify bacteria into two major groups: Gram-positive and Gram-negative.
What are the staining techniques for light microscopy?
Some common staining techniques for light microscopy include Gram staining, Acid-fast staining, Endospore staining, and Flagella staining. These techniques use different types of stains to highlight specific structures or characteristics of the sample.
Sources:
- Staining Microscopic Specimens and Descriptions from libretexts.org
- Malaria Over-Diagnosis in Cameroon: Diagnostic Accuracy of Fluorescence and Staining Technologies (FAST) Malaria Stain and LED Microscopy Versus Giemsa and Bright Field Microscopy Validated by Polymerase Chain Reaction by Sean M. Parsel, Steven A. Gustafson, E. Friedlander, A. Shnyra, A. Adegbulu, Y. Liu, N. Parrish, S. A. Jamal, Eve Lofthus, L. Ayuk, C. Awasom, C. Henry, C. McArthur, published in 2017. This paper discusses the accuracy of different staining technologies in the diagnosis of malaria.
Please note that these sources were used for inspiration and to ensure the accuracy of the information in the blog post. They do not necessarily reflect the views of the author or constitute an endorsement of the methods discussed.

Sean Schepers is a third-year Medical Technology student at Mahidol University with a passion for all things health and medicine. His journey into the world of medicine has led him to explore various fields. Sean's blog posts offer a unique perspective, combining his academic insights with personal experiences. When he's not studying or blogging, Sean enjoys keeping up with politics and planning his future career in medicine.
In addition to his studies, Sean serves as the chairman of the Rights, Liberties, and Welfare Committee, a role that reflects his commitment to advocacy and social justice. Beyond his academic pursuits, Sean offers tutoring services in English and Biology, further demonstrating his dedication to education and mentorship. His journey is one of continuous discovery, and he invites others to join him as he explores the dynamic and transformative world of medical technology.